
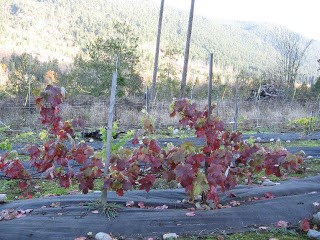
This year, I think we may have a winner. Half of the grape varietals chosen for here are doing GREAT
First year pruning:
First off, I disagree with the instructions to prune out all side branches to the trunk. As with young fruit trees it is always preferable to leave one growth node on the branches you cut back.
Leave a STUB? That used to be unforgivable.
But the truth is you leave less chance for bacteria or fungi to enter the main trunk.
Second, by leaving these phantom limbs on the plant, it will have less of a tendency to sprout into weak, ultimately prune able top growth. The plant will continue to grow in a different manner, often developing a thicker trunk.
Not only will this plant be marginally more cold resistant, but the stubs with their leaves will provide some trunk protection, as well as second chances should we have a bad freeze.
A digression. If you do have a severe freeze, it often is caused by the thawing and cracking of the sunward side of the plant that will later allow diseases to enter, and or simply weaken the plant in the upward transportation of plant nutrients.
Returning to the first year pruning. Make sure to tie up the vine and be sure to use a pliable, eventually self-destructing tie.
Next year, should the chosen vertical survive; you proceed to choose the best candidates for laterals. The pruning instructions given by the wine grower’s guidelines are very good.
At this time, you can delete the stubs you had left. Try not to do it while the sap is flowing, as this will weaken the plant. This is even truer for Kiwi vines.
Another caution I have, make sure your tools are sterile. Use alcohol to clean the shears before pruning. If you hire someone, remember you don’t know where those shears have been. Make them clean their shears before touching your vines. In an older vineyard, I would re-sterilize my shears before moving from one cultivar row to another. This helps to limit whatever mildew, fungii from traveling from row to row.
The same holds true for summer pruning when you are thinning out old growths and when you leaf thin or take out excessive young growths. At this time you also may be dealing with spider mites and or scale insects,
I would also micro adjust some of the height choices, beginning the first laterals closer to the ground. I would also use ground cloth and cobbles around the base of the plant. If you have the loot, covering the ground cloth with chip rock may help in retaining evening heart as well as making the tarp last twice as long.
Buy high quality ground cloth, not the junk sold at Home Depot. There are many Greenhouse supply companies that sell this but freight costs suggest that it would be smarter to go to the better local nurseries or co-ops.
Negatives to using it … especially if you go with more than a three-foot strip. It will severely impact your ability to fertilize. Nitrogen translocates, but phosphates and potash only move a few inches down. This will ultimately encourage a shallow feeder root system, which will dry out faster and suffer more from freezing. A Ross root feeder might be useful in the second and third year. Having applied fertilizer and lime in the planting hole should keep you from having to fertilize at all during the first year. A foliar application, containing trace elements might still be useful. Magnesium is very important and an application of Epson salts in Oct. might be suggested. BTW – renting a posthole digger is a fantastic way to dig your planting holes. Best of all you get a three-foot hole.
Laying out the grapes.
Put in the posts and lay out a three-wire trellis. The first wire should be strong and tight. I would start at two feet, with the next two each one foot higher. During or after the first year, remove the temporary stake and twine the young shoot along the lower wire. Depending on the vigor of the plant it may reach its limit during the second year. It should be tipped off to stop its horizontal growth.
The second year should also be the beginning of a secondary arm by allowing another bud near the wire level to travel in the other direction.
If you have waited for spring your first year’s growth will have become hardwood and will need to be physically bent and twisted (CRACKING—always use both hands!) along the wire. This usually works as long as the sap is beginning to move. Grapes can be manhandled and twisted, as they will heal. The risk is in the bending, so many prefer to have the trellis ready in the first year and let the green, tendriling plant do the job for you.
Young green shoots can be tricky to bend over as they are brittle and can snap. If tying down the first summer, wait until they have toughened up and gained enough flexibility to bring them to the wires. Tie down during the morning hours when their moisture content is highest. Shoots that are limp and are tied down can break the next morning when they regain their moisture and strain against their new bondage.
So be the second year you should have a two-arm cordon. One is a year older and should be trained to allow verticals growths to grow to the second and third wires. By the third year one will find the second arm ready to be similarly trained. If you have planted your grapes 10 ft. apart you can easily have four to five uprights on each side. The choice will depend on the heat and sun you can get. Here I would probably opt for four.
The cordons are permanent but the uprights will need to be winter pruned. Most fruit develop from the first three to five joints of canes that have grown the previous summer. The same cane will not produce good fruit again. After harvesting, they must be cut back to the cordon. It will be a matter of individual preferences as to how many buds should be left to produce fruit. I would probably thin it to three. It will also be a matter of the individual varietal.
Other canes, which spring out on each arm during the summer, can be allowed to flop or grow as they wish. They will be used to replace the ones that have borne fruit.
Some rough prune these back as they finish the harvest.
Come winter one fine prunes them back to two buds above the cordon and lifts the four or five strongest one year canes and tie them vertically to the wires above. Use twine or aluminum wire, never copper. Iron wire usually rusts and breaks off when it comes time to prune. I prefer using twine, as sometimes the metal doesn’t and there go my shears!
Cut the tied canes about three inches above the top wire --- OR as some do, arc it over and tie again and cut three inches below the top wire.
We now have come to a mature grape vine. That winter these canes are cut back to just above one good strong shoot that has grown from its base. One then lifts up the summer shoots, selecting the four or five best, and repeat the process year after year. When and if one of the older stubs stops producing vigorous canes, one simply cuts it back to the cordon.
When – They should be pruned in late winter, about a month or less before the last frost, but before the sap flow takes off.
Summer pruning – to allow sunshine in to the vertically tied producing verticals.
Pruning the sprawlers to three feet, reduces the clutter and directs sugars into fruit production rather than into excess growth.
One also gets rid of the unproductive, weak and spindly vines. Thinning for quality is very important. This can usually be done in late June or July.
You also need to thin out fruit clusters to keep the strongest. Three to four clusters per vertical might be all one gets from a low wire setup.
Also the best pruning is with the thumb. Rubbing off buds before they become shoots is the best way to prune The Max-Tapener is a GREAT TOOL.
As grapes prefer non-acid soils, be careful not to use ammoniac fertilizers, they also should not be used in cold or sterile soils. Ammonium sulfate is the most acidifying.
Using ammonium nitrate is better as it will release in cold soil conditions. If you chose slow release fertilizers such as Urea form 38-0-0 70% is W.I.N. and works best with warm soils when microbial activity is greatest.
I.B.D.U has the same N. content and is more expensive. 90% W.I.N. Soil moisture content affects its usage and it is less dependent on soil microorganisms. Since Nurseries use bark soil mixes. IBDU is the preferred fertilizer.
I will skip the phosphates as you really don’t have much of a say.
Potash or Potassium is however very important. Many believe that it increases winter hardiness. Hence its use in fall.
Potassium chloride (adds salts to the soil) This is also called Muriate of Potash.
Potassium nitrate is more expensive but worth it as it adds Nitrogen as well.
It too adds salt to the soil. IBDU is the most salt friendly choice..
Another example: trace minerals.
The local Co-op sells a 5-10-10, one is Iron Rich, the other sulfur rich. I would use the first in the summer months, and the latter in fall. Sulfur, though acidifying is also though to enhance disease resistance and is just as important as Nitrogen in tissue formation.
Propagation.
Greenhouse, heal cuttings in July or August. Larger 8-10” hardwood cuttings in Nov. Put in a cold frame and over winter.
EDIT To do it all over again I would certainly leave out the ground cloth except for the initial planting. Long permanent strips of it can lead to moisture being redirected from some high planted plants to those lower down. Those above get little rainfall penetration and the ones down slope get far too much. It also affects weed control in the following manner.
Aside from the normal weed whacking which leaves weed seed debris, one constantly nips off tips and errant branches. A heavy duty flame thrower can eliminate some of these future weed problems. Not so if one has plastic tarps around the plants.
© 2008 Herb Senft