
I just received a message asking if I sold bees in “those little packets? … My husband buys bees to pollinate our fruit trees and flowers. Hard to come by at the Nursery’s anymore.” ….. “These are VERY NICE bees. They don’t ever attack.”
No, I do not sell them, but if you make a suitable house for them, they will come to you – or find someone with an active nest who would share with you for a season.
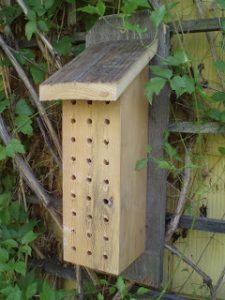
Making a Mason bee box is a simple woodworking project that can be done in an hour or so. All that is needed is some scrap wood and a sharp drill. There are also alternatives that I will note below. To begin I will give the basics for the basic wood block home. This should always be cleaned and after a few years discarded and burned.
CLEAN drilled holes are a must. Use a sharp drill and withdraw after a few inches and drill again. Drill all the way through and use a backer that can be removed. Many species of bee prefer deeper holes. Remember the female eggs are placed in the BACK of the hole and male sacrifices are put in the front. The deeper the hole, the more females will survive.
The most effective hole size is close to 5/16″ in diameter and 6″ deep. If holes of less depth are used, the nesting females will produce fewer female and more male progeny; if deeper holes are used, the extra space is wasted.
Also, it is a good idea to clean out the nest boxes on a yearly basis: sterilize with a dilute 5% non-scented bleach solution and drill out or replace them every few years.
| Use pegboard as a template for holes and align them on a 4 x 4 – or preferably a 4 x 6 block of wood. Start a few inches from the top so you can cut the block on an angle for drainage and a sloped roof. Drill 5/16” holes, all the way through the wood. I know most people say not to but I will explain why. I use the drill press to do this and a sharp bit. |
 |
Drilling ALL the way through makes it easier so that later I can re-drill and clean out the dead larvae, mold and what not. You then screw on a tightly facing back plate that can be removed in the fall making the re-drilling easier and more effective. No mold or crap can stay in the back compressed sawdust.
Topped with a nice board. The roof should fit on the forward slanted 4 x 6 and put a mounting assembly on the back. Sandpaper all the jagged drill holes clean!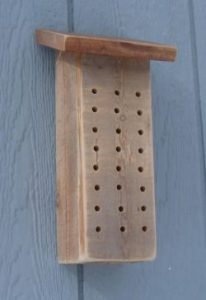
Place 3-5 feet off the ground
Place east or south-east facing in a place where the morning sun can heat it up fast. South- East is great as they need to get warmed up to get going.
Try to place near a source of mud – make a mud pie in a flower pot saucer nearby.
My mason bee house is made of a 6″ wood block, drilled with approx. 5/16″ holes. The required hole spacing is debatable, but people often use 1/2″ spacing. Cleaning these holes is hard or ineffective unless the house has a removable back.
 |
 |
Always mount your wooden blocks so the rain can drain and not create mold.
South facing walls are very helpful as they need to get up to a certain temperature to fly. Direct sunlight is a MUST, but if you live in a HOT area, try to give it some shade from the afternoon sun or your larva may fry.
Cardboard tubes with paper lining or homemade paper tubes work well for nesting, but they are disposable and will need to be replaced. Pull-apart wooden blocks can be a great material since they’re porous (allowing moisture to escape), and they’re easy to clean, sanitize, and reuse.
Paper products can be hard to use due to the Northwest’s damp climate. Drilled blocks must be made so they can be drilled out each year as all these homes can and will get infected with microscopic pests such as mites or molds. Paper tubes are very vulnerable to wasps as well.
Come October clean out with diluted Clorox wash, sanitize and drill out to open up the holes again. Let air!
Last note: Unlike the more swarm numbered bee mason bees are solitary and are often preyed upon by birds. Robins, crows, starlings – much less the happy woodpecker. They also tend to be sluggish in the morning while they soak up the (sun??) and or while they are gathering mud for their nests. Small mammals like squirrels, racoons or rats also feed upon them.
Finally: To suggest that there is only one Mason bee method is wrong there are many.
1. The drilled wood blocks that I like – Bare wood only. The negatives: This is a permanent home, and one cannot extract cocoons for cleaning and mites will build up. It becomes a trap. Further, mites can spread through cracks and infect neighboring holes.
2. Same drilled wood blocks with liners or tube inserts. Possibly a better approach. In the Pacific Northwest I have found them to absorb too much moisture and you get mold.
3. Cardboard tubes in an open container (plastic pipe, can, cardboard cylinder, etc.) Wasps are a real issue with this one. Same problem with moisture, but more importantly, wasps can chew through the paper and mites can still be an issue.
Some have made a hybrid mix by using non-glued paper liners in drilled wood blocks and putting in reusable silicone plugs to seal the back.
No parasitic wasps, less mites, no scraping, washing and drying and if you use good quality craft paper, there will be little mold.
Negative: Rolling the paper liners takes time, but by starting new every year you are assured of a healthy colony. The same can be said for making new wood block homes and burning the old.
Going back to number 1. Normally mites are able to navigate between the cracks in wood OR trays. When adding and using paper rolled tube inserts this is lessened.
Further note on Mason Bees and their specific mite problems – very different than the honeybee mites.
Watch-this-native-pollinator-build-her-bee-jeweled-nest
Member of the North Olympic Beekeepers’ Association.
I happen to be keeping the clubs library at my home, free for loan to NOPBA members.
(C) Herbert Senft 
How to over winter question:
No to the fridge unless you put the BUGS into the vegie crisper. For the length of time you need to store them a fridge will dehydrate the critters. Far better to put them into a cool barn or unheated garage and make sure it is mouse proof. Still needs air so zip bagging them is no good. Perhaps a rubbermade container.
Personally, I just stick them in there and keep the mouse population controlled.
Or I leave them outside – I tend to forget about them until spring. Not good. 🙁
No woodpeckers where I live – so far they have done okay.
Treating and saving live cocoons is a different matter but same idea – except you need to disinfect them first, dry them and then store.
5% unscented bleach solution – swirl the cocoons around for 5 minutes. Rinse with water, dry on a paper towel at room temperature and put into a cardboard box, then into something mouseproof. So exposed, they cannot take serious freezing.
In Spring, you can then reinsert them into the nests or tubes but make sure they face forward – smaller nipple sized shape facing the exit. OR just put the mouse/bird proof container out with a small hole drilled into it so they can fly out and find a nesting box to settle in.
The nearby mud tray is very important for this to work.
another source of information: Crown Bees in Woodinville https://crownbees.com/
Been raising these gentle bees about 4 years now and their numbers continue to grow, even in urban Seattle. Will be transferring most to Sequim this winter. These are early bees and first to emerge among the bee population which I needed for my Asian pears.
Need a supply of high clay content, moist soil in ample supply; this is what the masonry is made from. I have used cat litter (unscented, non clumping, unused of course) in a cut off plastic bottle near the blocks I have made as my soil is a non-compactable silt.